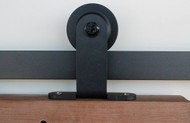
A Look at Barn Door Hardware: Gage Hardware Kit
May 19th 2020
Once you’ve chosen your sliding barn door, the next step is choosing your hardware. It's our pleasure to recommend to you the Gage hardware kit.
This kit has a versatile and understated design that matches perfectly with any of our BarnCraft Collection sliding barn doors. Styles as diverse as the X Two Panel Barn Door and the Modern French 8 Lite Door are equally complimented by the Gage hardware.
Best of all, with the right tools and a thoughtful approach, anyone can install this hardware kit.
Getting Ready
Before you start installation, you will need
- A drop cloth
- A hammer
- A stud finder
- A tape measure
- An electric drill
- A ratchet socket
- #10 3” screws
- Nails
- A utility knife
- A six foot level
- A header board (optional, but highly recommended)
Once you’ve gathered these supplies, lay out your hardware kit. Ensure all the correct parts are present and accounted for.
Included with the kit is a written instruction guide. Read through this carefully before commencing installation. Continue to refer back to the guide as you proceed with the install.
Measure First
Carefully measure the width and height of your door opening, and the width of the door casing.
Next, check the level of the floor beneath the door. If the floor is uneven, the install height of the track should be based off of the lowest floor level. In some cases, the door may need to be trimmed.
Install the Header
While optional, a header is highly recommended for a secure wall attachment. The header can be installed above an existing door trim, or the trim can be removed, and the header installed in its place.
Use your stud finder to mark the wall studs, then drill pilot holes in the header board to align with the studs.
Align your header board against the wall and check that it’s level (another person is helpful for this step). Use #10 3” screws to secure the header in place.
Install the Rail
As mentioned before, the height of the rail is determined by the lowest point of the floor. Once you’ve determined this height, place the rail onto the header and level it. Mark the locations of the installation bolts.
Drill pilot holes in the header for the bolts. Then place a stand-off bracket between the rail and the header and secure the rail using the provided lag bolts. Repeat this process for all bolt locations.
Lastly, place the provided stoppers on each end of the track. Secure them with the provided Allen wrench.
Install the Gage Rollers
Mark where you’d like your rollers positioned on the top of the door and drill pilot holes. Then mount the rollers to the door using the provided screws. Remember that the distance from the bottom of the roller wheels to the top of door must be 1-7/8”.
Once the rollers are mounted, install the anti-jump stops to the top of the door with screws.
Hang the Door and Install the Floor Door Guide
To place your modern barn door on the rail, you’ll need a second person to help. Once in place, mark where the floor door guide will be. Then install the floor guide with the provided screw.
Install the stoppers at the closed and open positions of the door.
Finally, and most importantly, enjoy your beautiful new sliding barn door!
Don’t Hesitate to Ask
We’re always eager to answer questions and assist with the install. You can reach us by phone at 713.400.6626 or e-mail us at info@barndoorz.com . Happy DIY!
